For those who don’t think they have a budget, nonsense! That’s pure laziness. You always have a budget. You may not yet be aware of it. So, let’s spitball it.
Profit & Loss (P&L)
Budgets are starting points that can change over time with the right justification. Let’s get started!
A P&L works like any budget in that it has all the Income (revenue) minus all the expenses = how well you are doing. In business terms.
Revenue – Expenses = Profit and (Loss), hence the name P&L.
The P&L takes this a step further in breaking up the expenses into two categories: Cost of Goods Sold (COGS), or costs associated with the core revenue production. This gives you your gross profit. But that’s not enough for the street. You must also remove your Operating expenses or Selling, General, and administrative expenses (SG&A). This gives you your Operating Income. This knowledge is powerful, because if you can show clear line of sight to increasing your profitability, you are creating leverage in potential money. Even if you don’t have the money in hand, this leverage is a key to opening the door to get the investments your boss (or investors) needs to make in you to scale your business.
If you don’t have P&L ownership, create your own budget to track. Currently, you generate something – what’s that value? If you are a revenue-generating team, that’s easy to define – what is your revenue? Are you a “cost of goods sold” that doesn’t have direct revenue? Well, those goods couldn’t be sold without you, could they? What is that value to your internal clients? Think about what they would pay if they had to use an external vendor for your services. Now think about the proportion of your services to the overall product of service they are receiving revenue for. If an external vendor charges $100 for similar services, but your company generates the same service cheaper through your team, and the product your service goes into is only going for $80, then your value is something smaller than $80. How much it is will depend on the other costs of the other parts of the product. If you are producing the entire product being sold, but you don’t have the responsibility of paying the team that is selling or marketing the product, well those are costs the company is paying that you need to subtract from the total cost of the product. What remains is your value to the overall product. This is your revenue. Another way to figure out your revenue is to figure out your company’s markup, and then take all your costs and expenses and apply that markup on it. It’s not exactly representative of your revenue, but it’s close enough to get you started.
Now, let’s calculate your costs. For simplicity, let’s bucket it into Cost of Goods Sold (other support costs that you need, such as IT services, 3rd party services, etc.) and Expenses such as labor costs, advertising, office space and supplies, technology costs, utilities, insurance, taxes, and anything else you need to provide. You may not be responsible for all these costs, in which case, you’d bucket them in “cost of goods sold” for the purpose of your mini P&L because they cost your business even if they don’t cost you but go ahead and keep your resource cost and direct cost of resources (facilities, etc.) in your expense bucket because you can use this as leverage later on.
Here’s how it works:
Are you making a profit, or making a loss? A loss is certainly not good, but being aware of it is very powerful. What can you do to trim down your costs or increase your revenue to turn that loss into a profit?
Once you have a budget, the name of the game in capitalism is “Better, faster, cheaper.” If you can take your P&L and identify ways where you can do better, faster, or cheaper without risking profit, you are doing well.
Doing things better increases your street credibility and brand image. That’s sales credit and reduces your costs. That’s profit for the taking.
Doing things faster means you can do more of it in the same amount of time – that’s profit for the taking.
Doing the same thing cheaper, is profit for the taking.
The logic is simple. If you can create more profit, you are creating value for your organization. Spitball it now, what value does your team bring to your organization?
With so many doing it wrong, and so much on the line, what should we do? While a formal onboarding program is designed to help managers consistently do better, a manager is still the make-it-or-break-it factor in onboarding. If you’re a manager, here is a guide for you. This roadmap is meant to flex with your needs.
Pro tip: If you need someone to get up to speed quickly, you can fast-track this by diving into the content for what they need to know now, but fair warning, you should still come back and fill in the skipped content as soon as possible. A poor onboarding experience is risky to both the new hire and the organization. Just as onboarding too quickly is problematic, onboarding too slowly can be equally detrimental. By the end of the second or third week, a person should have experienced the level of pressure they will be expected to endure during their tenure.
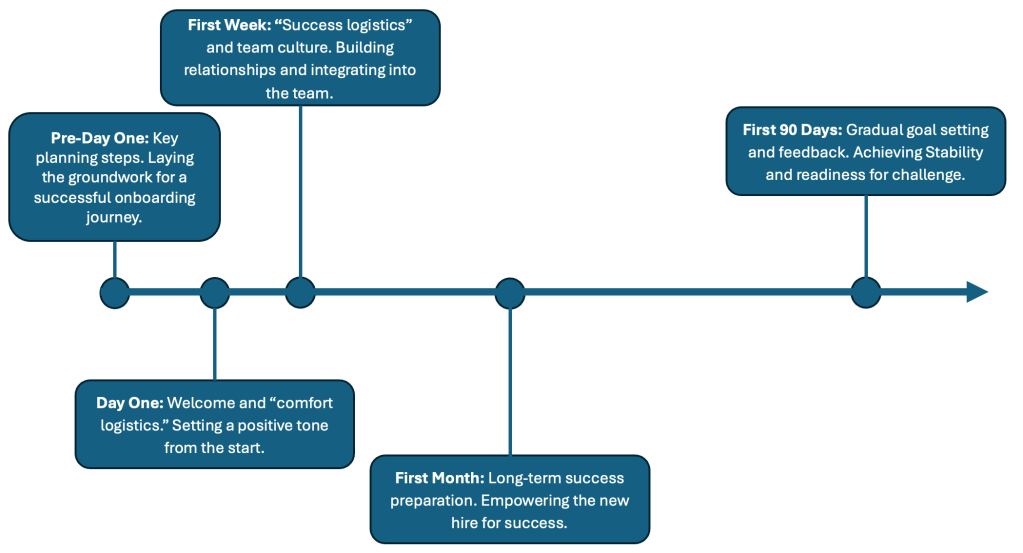
Pre Day-One
Onboarding planning begins way before you have an opening. If this is a net new position, it begins when the product or service is identified. It begins with a map of what the role entails and the expectations you have for it, which goes beyond a job description.
If this is a replacement position or a duplication of another role, it begins by observing the behaviors of the existing talent. As a manager, take note of what that person does well and where there are opportunities for improvement. Hopefully, you have the foresight to have the person in their role create their Standard Operating Procedures (SOPs) or how-tos and/or review them for updates.
Consider the qualities of people who succeed and the differences between those who do and those who don’t. Integrate these insights into the onboarding plan to set the new hire up for success.
Before the new hire starts, think about the kind of network you want them to have.
Who are their external customers?
Who are their internal customers?
Who are their peers who will form collaborative teams with them?
If they have any direct reports, who are they?
As the proverb goes, “The best time to plant a tree is 20 years ago. The second-best time is now.” If you didn’t plan everything before hiring your new starter, that’s ok. Gather what you can now and consider involving the new hire in documenting their learnings.
About 4 weeks before the first day (this varies by company and by country):
The new hire completes pre-boarding forms, including signing employee contracts.
The manager arranges for a computer, desk space, phone, and other logistics.
Request necessary technology and licenses.
Add the new hire to distribution lists and shared environments like SharePoint, Teams, groups, and files.
Plan who the new hire should meet and inform relevant people. Send a note to each person, including the new hire’s name, role, start date, and topics for discussion.
About two weeks prior to the first day:
Prepare a welcome packet with information about where to go, who to ask for, company culture, and dress code. Even if the work environment is ultra-casual, inform the new hire to reduce stress over attire. If they are onsite, include details about amenities, break room, and lunch plans.
One week before the start date:
Call the new hire and share Day 1 instructions, including parking, security processes, dress code, lunch plans, and office space details. Inform them of anything they need to bring, such as a government ID or a personal device. Walk them through the first day’s schedule. If attending new hire orientation, ensure they know what to expect, where to go, and who to ask for. If they are working remotely, explain system access and share the week 1 schedule.
Pro tip: have some business swag ordered for them to have on their desk for day 1. If you cannot do that, at least get a pad of paper and a couple of nice pens. Even though many people use computers or personal devices such as their cell phones to take notes, on Day One a notepad is very handy.
First Day
Welcome the new hire but don’t overwhelm them. Let them get into the new systems and meet a few key people. Have a welcome pack ready with resources and system links.
The first day is about welcoming the new hire, handling “comfort logistics,” and introducing company culture.
The first day is about welcoming the new hire, handling “comfort logistics”, and introducing company culture.
“Comfort logistics” are logistics that are suited to help the new hire – such as how to sign up for benefits, how they will get paid (including setting up direct deposit where available), how to access email and voicemail, and where and when to take breaks.
Arrange for someone to meet them in the lobby (preferably their direct line manager, but a buddy or host is acceptable if the line manager is not local). After showing them to their desk, give them a tour and introduce them to key office personnel. Don’t forget to stop by the break room, restrooms, and most importantly, IT. Share details about how to get their badge photo and key card.
Pro tip: Plan for someone to take the new hire to lunch on the first day. Know ahead of time if your new hire is comfortable in large groups or prefers smaller settings. A shy person might prefer lunch with a well-chosen peer, while someone eager to make an impact might prefer lunch with a senior leader. A social person may enjoy lunch with the whole team. When in doubt, many would enjoy a low-key lunch with their new boss, where they can ask questions and start building a working relationship.
On their first day, their direct manager should spend some time with them, welcoming them to the company and discussing:
What to expect in the onboarding journey
Key players they will meet
Key facts about the company, department, or role
Even if another team leads the onboarding program, find a way to personally welcome your new hire.
If the new hire is remote, don’t forget to check in early to ensure they received their login information and can set up their computer. Few things are more frustrating for a new hire than planning a great first day and feeling like they’re letting people down because they can’t log in.
First-Day Checklist for the Manager:
Welcome them in person or with a host
Have your new hire sign any incomplete employee contracts
Allow time to set up the computer (typically 1-2 hours, but some companies may take all day)
Allow time to set up the phone and voicemail
Send an announcement to the team welcoming the new hire
Cover the agenda for the day and the first week
Share the company overview (Mission, Vision, Values) – this is your opportunity to introduce the new hire to your company culture and, more importantly, the culture you want to create in your team
Introduce them to a Buddy/Host/Mentor – someone other than the manager who can help them navigate the company. Common topics include how to navigate HR topics, the company intranet, internal websites, and where commonly stored information is. This person can share unspoken guidelines and expectations necessary for success and introduce the new hire to other people in the company
First Week
The first week is about “success logistics” and team culture. “Success logistics” are essential for the new hire to succeed at their job, including necessary tools, training (though not all training may need to be completed this week), building relationships, and team building. Set the new hire up for success in owning their development and navigating your organization. This may involve navigating people and tools and showing them where key things are housed. During the first month, your new employee will meet new people. Prepare them to have the best meetings possible by having them prepare an elevator pitch about who they are and what they hope to accomplish in their role.
First Week Checklist for the Manager:
Have the employee complete onboarding forms: Such as I-9 or local workforce forms.
Review HR policies and Code of Conduct: Provide them the opportunity to review these documents.
Schedule safety training content: Depending on the content, this may need to be completed in the first week or may be delayed.
Cover HR topics: Such as benefits setup and expense policies.
Order business swag: Show them how to order items like polos with logos, jackets, coffee mugs, or even business cards or letterhead.
Locate the staff directory: Show them how to find this.
Team overview: Provide them with an introduction to what the team does.
Terminology: Start a terms and acronyms sheet so they can interpret the local lingo right away.
High-level role expectations: Introduce these on Day 2 or the first actual working day. Setting expectations early is crucial in the onboarding process.
Introduction to peers and stakeholders: A simple hosted drop-by hello is ideal for this first week. Before longer 1:1 meetings with peers and stakeholders, which should occur during the first month, give the new hire an overview of their own responsibilities and your expectations of the new hire. That way they are prepared when stakeholders start setting their own expectations.
Pro tip: Plan an activity with key stakeholders and the new hire. This can be a lunch among peers, an easy or fun project, or even a dinner with a senior exec. Leverage opportunities to build genuine relationships early on.
Active work introduction: What will they be working on right away.
Product or service knowledge: Cover any necessary knowledge.
Required training: Introduce required training and deadlines.
Tools training: Train them on the tools used in the first week. There’s time later to train on other tools.
While this may sound like a lot, the above content only takes a few hours to cover. Give them the gift of a solid foundation, and you will reap the rewards later.
First Month
Set the new hire up for success by equipping them with the knowledge they need for their job. While they bring many skills to the table, you should show them how to find out what they don’t already know, including where to find content and who the key knowledge holders and well-networked individuals are in the office.
The first month is about making sure your new hire will succeed long-term. This is a great opportunity to give them clear goals with achievable deadlines and confirm whether they have the skills for the longer road ahead or if you need to help them develop additional skills for their journey. During this time, you’ll be showing them the concrete SOPs along with the unspoken culture of “how” to get the job done. But you’re also going to give them the keys to the city: a network that will help them find what they don’t know. This network is going to be stronger than you ever could be by yourself.
You’re also going to give them the keys to the city: a NETWORK that will help them find what they don’t know.
Be sure the new hire has a rotation of meeting key players they will be working with. This includes key internal and external clients, peers, and support personnel who will enable their success. The new hire should be ready to ask and answer how working with this person will help them and how they can help that person. For those meetings, whether face-to-face or over a call, I recommend the new hire meet key stakeholders during 1:1 meetings where the purpose is to make introductions and discuss how they support each other. These meetings are anywhere from 15-30 minutes long. When thinking of the stakeholders – think of everyone they will be supporting and everyone who will support them. Who’s going to set them up for success? Who will they need to impress if they are to succeed?
I like having other people take a rotation of showing new hires different aspects of their job so that they don’t hear everything from one source, namely me as their manager. I divide up topics among peers and stakeholders and give them something specific to chat about. However, I have found that not all people intuitively know the points I want to have made on the topic.
Pro tip:
Pro tip: Think about all the topics your new hire needs to learn and create key talking points around each one. You can do this yourself or have your experienced resources create talking points that you review for gaps. Share the talking points with both the experienced resource and the new hire. That way, the resource knows what to cover, and the new hire is empowered to ask questions if the resource doesn’t cover a topic. They keep each other accountable for ensuring the conversation stays on track.
If the trainer wants to cover additional topics, that’s encouraged too. They have the flexibility to hit all the key points in one meeting or in a series of meetings—their time is theirs to use as they wish.
During the first month, focus topics on culture and networking, understanding who the knowledge holders are and how best to work with them, training on any tools that will be used in the first quarter, market-specific education, and process training. Set goals and timeframes for when those goals should be achieved and touch base weekly.
This is also a month for you to observe your new hire’s behaviors closely. If they are not acclimating or showing the skills you hired them for, identify it in this month and communicate a plan to course correct with them as soon as possible. One can always tell a superstar right at the gate, but don’t let that fool you about late bloomers. Some of my most solid employees were late bloomers who had a larger learning curve than I hoped for, but once they got past it, they became the best trainers for others.
However, sometimes managers have warning signs in front of them but are afraid to take swift action in this first month. Remember, some of my best employees took a long time to learn their roles because they learned it meticulously. They asked many questions, and once they got it down, they were the best trainers available. These people may not yet have all the success skills, but they are very engaged and eager to grow, and you can see their growth, even if not at the pace of your expectations. These people are worth the wait.
But not all slow adopters are eager to learn. Some will not succeed in the long run. You’ll be able to identify those most at risk of not being successful because they are off track and not showing significant effort in making it up. They do things your top employees wouldn’t dream of, such as making excuses that may sound reasonable to them but don’t feel justified to you. This is your month to act swiftly before their apathy affects team culture and morale.
First 90 days
Set the right expectations and goals with the new hire and develop a graduated plan where goals increase over the first 90-120 days. During the first 90 days, check in with your new hire not only on their progress towards meeting goals but also on how they are growing their knowledge. This doesn’t have to be a formalized assessment process, but you should rotate through all their responsibilities to ensure comprehensive training. During this time, inspect what you expect to ensure your employee understands and aligns with expectations. Be sure to transition out of this inspection mode quickly to avoid being seen as a micromanager. Make sure your employee knows this close oversight is temporary.
Plan monthly check-ins on progress to provide and receive feedback. New hires often have valuable insights into improvement opportunities. I like to ask new hires to list what they wish they had known or provide feedback on the onboarding process for future hires.
After the first 90 days, a new hire should be working at a long-term pace. Some roles take longer to learn, but 90 days is generally a good stabilizing point. Between 3-6 months, employees may face significant challenges that test their abilities. They might even make significant mistakes, but that’s okay; they will learn from them and be better for it in the long run. That, too, is a journey and learning opportunity and they will be humming back along on path in no time.
Here’s a quick overview of what that onboarding roadmap looks like:
Onboarding is more than just a process—it’s a journey that shapes an employee’s future within the organization. By thoughtfully planning and executing each step, from the initial welcome to ongoing support, you set the stage for long-term success and fulfillment and reduce your chances of the employee leaving. The roadmap provided here is designed to adapt to the unique needs of each new hire, ensuring that they are not only equipped with the skills and knowledge they need but also feel valued and integrated into the company culture. Remember, a successful onboarding experience paves the way for a productive, engaged, and loyal workforce. Let’s make every new hire’s journey an inspiring one.
Don’t let biases stand in your way. Most of us who have done interviewing have learned about biases. The tricky biases are the unconscious biases. One effective way to navigate this challenge is not to interview alone. However, you don’t need an army of 14 interviewers. A well-structured interview process would include 2-5 interviewers. Remember, the more critical the role, the more interviewers needed, but if you find you are needing more than 5 interviewers in your process, likely another issue is occurring, such as a breakdown in trust amongst the interviewers.
Once you have decided to interview as part of a panel or with a recruiter, ensure consistency in understanding job requirements and expected responses from candidates across all interview stages. Consistency promotes fairness and objectivity. Clarify your conflictive understanding of what you are interviewing for, and then divide up the responsibilities. You should trust that each interviewer will assess the candidate to your standards. If it’s a recruiter doing a pre-screen, they will often ferret out hard skills and experience (resume review). If you trust your recruiter you don’t need to do this again.
But what if you have never used this recruiter before, or worse, you have and you still don’t trust them? Spend time in advance agreeing what they will be doing. Seek the recruiter’s understanding of the skills you are looking for. If they struggle to answer basic questions, how can you expect them to probe into your candidates appropriately?
Sometimes lack the background needed to do a hard probe. Remember, they are skilled recruiters and don’t often have the experience in the role you are hiring. That’s okay! Leverage their strengths. Can you trust them to validate a candidate’s working experience, reasons for leaving a job, job hopping or gaps in employment? A good recruiter should be able to identify that the candidate has met the basic requirements of the role. If you are receiving candidates who are not meeting the basic requirements, revisit your calibration with the recruiter. At the same time, you, as a manager, should know what truly sets someone up for success in your organization.
If another person on the interview panel doesn’t align with your interviewing expectations, scrutinize their fit. Consider whether they can effectively contribute to evaluating candidates for the specific role you’re trying to fill. If they cannot, they might not be the right fit for the panel.
As a leader, you might want someone on the team who can learn how to interview like you. In such cases, conduct joint interviews with that person. Assign them specific questions, but be present during the interview. You can probe where necessary or gently guide the conversation. If the person has never interviewed before, do not have them interview alone until you are confident in their feedback. If you put them in that position, it’s your job to make sure they have all the tools and skills necessary to succeed.
Yes, doing all this preparation before you hire takes a long time, but the effort put up front into hiring the right person, will pay off.
Hiring is one of the most important and difficult tasks for any manager. When you’re hiring your team you need to find someone with the right knowledge, skills, abilities, behaviors, and fit for your organization.
While many hiring managers primarily focus on competencies or experiences, we shouldn’t overlook the other dimensions that may not be easily assessed in an interview. For this reason, assessments that can look at all dimensions are of value. Different types of assessments work best for different types of needs. For instance, the KFLAP works great in leadership roles or roles of a very critical nature. But for more entry-level roles, a skills assessment could be appropriate. Where you place an assessment is also important. If you’re looking at a hard skill, such as typing speed, you can place the assessment before an initial interview. If you’re looking for a competency or behavior, you should place the assessment before the interview so you can develop probing questions to get a deeper look during an interview.
But what if you’re short on computer-based assessments? Let’s explore a few tools you can put in place today to help make sure your next hire is the right one.
Defining Success: A prerequisite
Before embarking on the hiring journey, clarity on success criteria is essential. Begin with the end in mind. What does success in this role truly look like? Do you have a job description? If not, pause and build it, thinking about it carefully because it is the basis of the contract you will have with your future employee. Do you have clear expectations for the role? Expectations and goals are different but very closely related. Expectations represent an expanded job description. If your employee does everything on the expectation list, they will be doing the job well, not just getting by. In fact, this would be a person you would want on your team so long as the role is needed. Goals, on the other hand, elevate that person to their next level. If they are not meeting expectations, perhaps leveling up to meeting expectations is the goal. But if they are already meeting expectations, then what can they do to raise the bar? It is important to understand your own expectations of the role before embarking on the hiring journey.
If you already have employees in the role, think about what they are doing well and what you tend to coach them on. Consider elevating the job description based on your learnings of the role. Expectations for the role can and should change over time because the role should evolve over time.
When you are ready to go public with your job description, don’t just rely on the traditional posting venues. Lean into your network. Everyone knows someone, and the highest source for hires is traditionally referrals. Who do you know who might know someone good for this role? Where are you already networked where you can get the word out? Do you have a LinkedIn account where you can advertise your role in your network? Even though referrals are a great source, if you get a referral, do your due diligence. Vet the referral. Ask the referrer how they know the candidate and what they know about the candidate’s work output and work ethic. Seek a deeper understanding of potential skills and behaviors that would make this candidate a good fit for the role. Make sure the referral meets all your qualifications before progressing them through the process. If they don’t meet the qualifications and you still want to progress them, then you need to pause. Were all those qualifications really necessary? If you’re willing to budge on a requirement for one person, you need to budge on that same requirement for everyone. Not doing so can be the limiter to allowing your RIGHT hire in the door.
Also, don’t forget your internal network. Sometimes internals with less experience are still better candidates because they bring the company knowledge to the table. Company knowledge should be treated like a skill that can only be trained on the inside. It’s up to you and your specific situation to determine how much you prioritize previous company knowledge. Sometimes having an existing network can leverage a person into productivity faster. Sometimes, if you’re trying to change the culture, for instance, it can be best to go externally.